Wednesday, November 1, 2017

Meatloaf


Who knew meatloaf wasn’t the invention of thrifty housewives during the Great Depression? The idea of mixing meat with a tenderizing filler traces back to the fourth or fifth century AD, when in a Roman cookbook Apicius presented a recipe for patties made of chopped meat, bread, and wine. But it wasn’t until the late 1800s that American meatloaf was born, inspired by recipes offered by manufacturers of the newly invented meat grinder.

The Depression only increased meatloaf’s popularity, along with developments in food manufacturing that produced flavorful, inexpensive mix-ins like mustard and bouillon. In the 1940s, World War II rationing spawned meat-free loaves, whereas postwar creativity in the 1950s and 1960s produced the likes of Bacon-Dill Meatloaf and Spicy Peach Loaf (Good Housekeeping Cook Book, 1955). In the 1970s and 1980s, veal, pork, and beef “meatloaf mix” came into vogue, elevating the dish to dinner party-worthy status. In the 1990s, restaurateurs marketed upscale versions, and today, innovations continue as loaves are stuffed, wrapped, or laced with international flavors.

Binder is an essential meatloaf ingredients because it creates an even, smooth texture. In additional to whole-wheat breadcrumbs, oats, or even cooked rice, it can include a generous amount of finely shredded or chopped cooked vegetables like spinach, carrots or broccoli. This will help your meatloaf be nutritionally smart.

I found a recipe for meatloaves that are cute and really tasty. They are moist, and have an extra kick with the bacon wrapped around the loaves. I have done this recipe twice since I like it so much. With a side of mashed potatoes you cannot go wrong with this homey meal.


From ‘Fine Cooking’ October/November 2017.

Mini Meatloaves Wrapped in Bacon

Serves 4

8 slices bacon

½ cup coarsely chopped onion

1/3 cup fresh flat-leaf parsley leaves

1 medium clove garlic

½ cup dry breadcrumbs, such as panko

1 large egg

3 Tbs. ketchup; more as needed

½ tsp. Worcestershire sauce

Kosher salt and freshly ground black pepper

1 lb. ground beef, preferably 85% lean

Cooking spray

Barbecue Sauce (optional)

Position a rack in the center of the oven and heat to 400°F. Line a large rimmed baking sheet with parchment. Arrange the bacon on the sheet with some room between each slice, and bake until crisp along the edges, about 10 minutes. Transfer to a paper-towel-lined plate to cool.

Pulse the onion, parsley, and garlic in a food processor until chopped, 4 to 5 pulses. Add the breadcrumbs, egg, ketchup, Worcestershire, ¼ tsp. salt, and ¼ tsp. pepper. Pulse 3 to 4 times to blend. Transfer to a mixing bowl, add the ground beef, and mix until well combined.

Lightly spray four mini loaf pans or 6-oz. ramekins with cooking spray. Cross 2 slices of bacon in each pan or ramekin, pressing the bacon along the bottom and up the sides. (Let any excess hang over for now.) Divide the meatloaf mixture among the pans, gently packing it in. Fold the excess bacon over the meatloaf. Bake until cooked through (165°F), about 30 minutes. Remove from the pan and transfer to a cooling rack. If you like, combine and equal amount of ketchup and barbecue sauce in a small bowl and brush some on the meatloaves before serving hot.


Soup


This week I am giving two recipes for soup that you will enjoy. I got excited when I read my new issue of ‘Southern Living’ and their take on seven soup recipes that looked really delicious. I have tried two of them and think they are worth giving to you to try. There is nothing better that seeing a pot of soup on the stove or in a slow cooker to take away the autumn chill. It always seems better the next day also!

From ‘Southern Living’ October 2017.

 
White Bean, Fennel, and Italian Sausage Soup with Parmesan Toasts

Serves 8

1 lb. mild Italian sausage, casings removed

2 cups thinly sliced yellow onion (from 1 medium)

1 cup thinly sliced celery (from about 3 stalks)

1 cup thinly sliced fennel (from 1 small fennel bulb)

3 garlic cloves, chopped (about 1 Tbsp.)

½ tsp. kosher salt

½ tsp. crushed red pepper

1 tsp. black pepper, divided

¼ cup dry white wine

6 cups chicken stock

2 (15-oz.) cans cannellini beans, drained and rinsed

1 (15-oz.) can fire-roasted diced tomatoes, undrained

16 (1/4-inch) French baguette slices (from 1 large baguette)

1 Tbsp. olive oil

1 oz. Parmigiano-Reggiano cheese, grated (about ¼ cup)

Chopped fresh rosemary

Heat a large Dutch oven over medium-high. Add sausage, and cook, stirring to crumble, until no longer pink, 6 to 8 minutes. Drain, leaving 1 tablespoon of drippings with sausage in Dutch oven. Add onion, celery, fennel, garlic, salt, red pepper, and ½ teaspoon of the black pepper. Cook, stirring often, until vegetables have softened about 5 minutes. Add white wine, and scrape any browned bits from the bottom of the Dutch oven. Stir in chicken stock, beans, and tomatoes; bring to a boil. Reduce heat to medium-low, and simmer 10 minutes.

Preheat broiler with oven rack 6 inches from heat. Place baguette slices on a rimmed baking sheet, and brush 1 side of each piece with olive oil.  Sprinkle evenly with cheese and remaining ½ teaspoon pepper. Broil until cheese is melted and beginning to brown, 1 to 2 minutes. Remove from oven.

Ladle 1 ½ cups soup into each of 8 bowls; sprinkle with chopped rosemary, and serve with toasts.


Prepare in the slow cooker:

Creamy Potato and Ham Hock Slow Cooker Soup
 

Serves 8

4 ½ lb. russet potatoes, chopped (about 10 cups)

2 lb. smoked ham hocks (about 3 ham hocks)

2 cups chopped yellow onion (from 1 medium onion)

1 cup chopped celery (from 3 stalks)

2 Tbsp. minced garlic cloves (about 4 garlic cloves)

2 Tbsp. chopped fresh thyme

2 ½ tsp. kosher salt

1 tsp. black pepper

5 cups chicken broth

1 cup heavy cream

Chopped fresh chives

Hot sauce (We prefer Tabasco.)

Place potatoes, ham hocks, onion, celery, garlic, thyme, salt, and pepper in a 7-quart slow cooker; add broth, and stir to combine. Cover and cook on HIGH until potatoes are tender; 4 hours. Remove ham hocks, and place on a plate to cool 15 minutes.

Puree soup in slow cooker with an immersion blender (can do in a regular blender) until it is creamy but whole pieces of potato are still visible. Add cream, and stir. Once ham hocks are cool enough to handle, remove all meat and chop; discard fat and bone. Add meat to soup, and stir to combine.

Ladle soup in bowls, top with chopped chives and a sash of hot sauce. I think the Tabasco really topped this soup off superbly. It would not have been the same without it!

Heard the weather man this morning predicting near freezing in a couple weeks; so use these two soups to heat up the now cool/cold weather.


Tuesday, October 10, 2017

Pork Chops


I really like pork chops, but they are not something you think of when you think of something special for dinner. Yet they are affordable and can be dressed up to suit any occasion.

Pork chops can absorb flavors of brines, marinades, and rubs because of their mild taste. Pork can now be safely cooked to medium/medium rare. Look for an internal temperature from 135°F to 140°F for just slightly pink chops, which is the key to keeping them juicy and tender.

I like the bone-in rib chops because they look impressive, but also the bone delivers more flavor and juiciness as it insulates the meat around it during cooking keeping it moist. The important thing to help the chop reach its peak flavor is to get a good sear before finishing the recipe. To get a good sear, start with a thick chop. They can be forgiving and can be seared to a golden brown without overcooking. Make sure the chop is dry before it hits the pan. Blot the surface with a paper towel before putting in the pan. Make sure the heat is hot before putting the chop in and don’t overcrowd. Sear the sides of the chop also by lifting the chops with tongs and rotate the chop.  Keep the fatty edge in contact with the hot surface to brown it evenly.

Now you are ready to try a great recipe that can be done in one skillet and really delivers on flavor.

From ‘Fine Cooking’ October/November 2017.

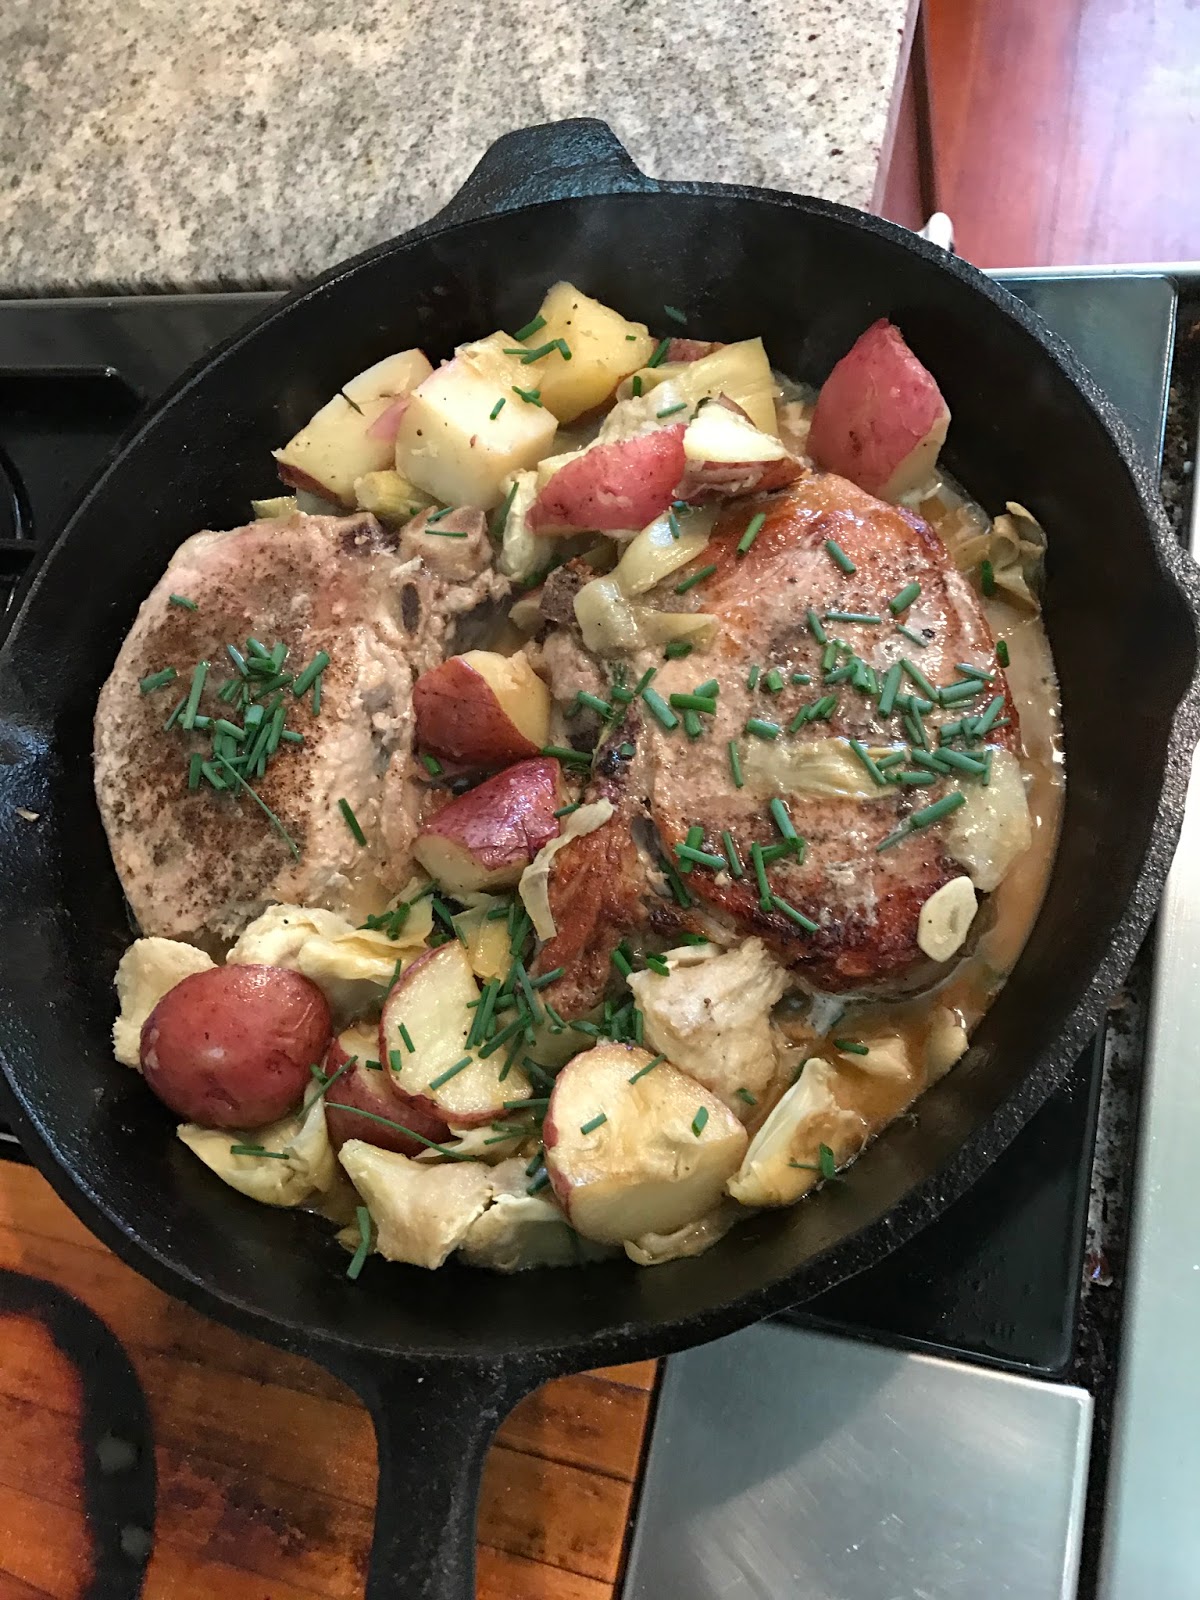
Roast Pork Chops with Baby Artichokes and New Potatoes

Serves 2

1 tsp. cumin seeds

Kosher salt and freshly ground black pepper

2 thick bone-in rib pork chops (about 2 lb.), trimmed and frenched if desired (Trimming the meat, fat, and sinew away from the inner and outer curve of the end of the bone. This is done for presentation. My chops weren’t cut so that I could do this.)

2 Tbs. olive oil

9 oz. fresh baby artichokes or frozen artichoke hearts, thawed

8 oz. baby new potatoes, halved (I used red potatoes that were not new.)

3 large garlic cloves, thinly sliced

2 ½ cups lower-salt chicken broth

4 sprigs fresh thyme

1 ½ Tbs. white balsamic vinegar

1 oz. (2 Tbs.) unsalted butter

2 tsp. finely sliced fresh chives

Position rack in the center of the oven and heat to 400°F.

In a small skillet, toast the cumin seeds, stirring over medium-high heat until fragrant, about 30 seconds. Transfer to a spice grinder and grind to a powder, then combine with ½ tsp. salt and ½ tsp. pepper. Season the pork chops all over with the spice mix.

Heat the oil in a large skillet over medium-high heat, and sear the chops, in batches if necessary, while spooning oil from the pan over the bone to baste, until each side is deep golden brown. Then, using a pair of tongs, lift the chops to sear the sides, about 4 minutes total. Transfer the chops to a plate. Add the artichokes and potatoes to the pan, and cook, stirring occasionally, until browned in spots, about 3 minutes. Add the garlic and cook, stirring for 30 seconds.

Add 1 ½ cups of the chicken broth to the pan, stirring to scrape up any browned bits. Cook until the potatoes are just tender, 3 to 5 minutes. Nestle the pork chops in the pan, add the thyme, and roast until an instant-read thermometer inserted in the center of a chop reads 135°F, about 6 minutes.

Leaving the thyme sprigs in the pan, transfer the chops and vegetables to a plate and tent with foil. Return the skillet to the stovetop over medium-high heat, and reduce the liquid in the pan until almost completely evaporated, about 2 minutes. Add the vinegar, stirring to scrape up any brown bits from the bottom of the pan, then add the remaining 1 cup broth, and bring to a boil. Remove the thyme sprigs, then whisk in the butter. Cook to reduce slightly, about 2 minutes, and season to taste with salt and pepper. Return the chops to the pan and spoon some sauce over the tops. Add the vegetables, sprinkle with chives, and serve.

I thought the potatoes and artichokes especially good.


Chayote


Chayote (Sechium edule) is a native of Mexico and has been naturalized throughout Central America and the Caribbean. It was raised as chocho in Jamaica during the 18th century and exported to North American markets along the eastern seaboard. It was also grown along the coast as far north as Charleston well into the 1850’s. The Civil War disrupted cultivation and it was not until the 1890’s that serious attempts were undertaken to reintroduce it as a truck-farm product under the name vegetable pear. In the 1920’s the US Dept. of Agriculture attempted to introduce the mirliton to a broader public in a project based in Homestead, Florida, using varieties imported from Cuba.  They used the name vegetable pear but lack of consumer demand ended the federally funded project. However in Louisiana where it is known as a mirliton it has been a basic ingredient in local cookery since the 1700’s. The mirliton remained in New Orleans where eccentricity in music, culture, and even vegetables is well tolerated.

My husband first encountered mirlilton when he lived in Haiti many years ago. We can find it in the markets here near New Orleans. He is always interested in growing them, and has, off and on for several years. There is a push from a fancier in New Orleans (Lance Hill) to save and grow heirloom mirliton. You can also use store bought ones to start a vine. My husband last fall found some in the New Orleans farmer’s market. The lady didn’t know a variety but had been growing them in Plaquemines Parish for some time so he calls ours Plaquemine mirlitons. We have had trouble overwintering vines in the past and have occasionally succeeded. We let these two mirlitons sprout and during last winter potted them and planted them out after the last frost. He re-read instructions: raised bed (Water-logging the mirliton is the best way to kill it.) and 12’ diameter room for the roots to spread. Plant in full sun, mulch. One needs a lot of support. They seem to fruit best on horizontal vines so perhaps grow on an arbor like grapes. The vines can grow 40 feet. We have never seen such vines as these two of ours have produced. They fruit due to day length and usually appear late October or November. We are having them early this year.

We had chayote during our recent visit to the Yucatan, cooked and served as a side to a steak instead of potatoes. New Orleans’ recipes usually call for stuffing them with shrimp. One author noted they can be pickled as a passable substitute for artichoke hearts; they make convincing French fries and gratins and pies, or they can be eaten raw in salads. The entire plant is edible. The greens can be used in salads and stir-fries, the tubers which can grow up to 20 pounds can be cooked as yams.

When you find them buy several. Do not refrigerate but eat fairly soon as they will start to sprout. Let some sprout and plant them out next spring. When you put them in a pot this winter do not bury the whole fruit as it will rot. They produce more each year and can produce as many as 400 fruits! We have not gotten that far yet.

I found a delicious recipe for mirliton in John Folse’s Cookbook, Dig It. Mirliton is good used in soups but does well with some cheese and spices. It has a mild flavor but soaks up the flavor of spices and herbs.

This is good. Give it a try.

Gratin of Mirliton with Fine Herbs

6-8 servings

4-6 mirlitons, peeled, halved lengthwise, and seeded

1 tsp. tarragon

1 tsp. minced thyme

1 ½ cups heavy whipping cream

1 tsp. salt

½ tsp. white pepper

Pinch cayenne pepper

Pinch ground nutmeg

2 tbsp. grated Gruyére cheese

2 tbsp. Parmesan cheese

2 tbsp. bread crumbs

Preheat oven to 350°F. Lightly grease a glass ramekin or baking dish and set aside. Using a sharp kitchen knife, thinly slice mirliton halves lengthwise and set aside. In a shallow bowl, season cream with tarragon, thyme, salt, white pepper, cayenne pepper and nutmeg, stirring to mix well. Dip half of mirliton slices in seasoned cream and continue to layer in baking dish. Sprinkle Gruyére cheese in a single layer over mirlitons. Dip remaining mirliton slices in seasoned cream and continue to layer in baking dish. Evenly pour remaining seasoned cream over mirliton and cheese. Cover tightly with aluminum foil and bake 30-45 minutes or until squash is tender. Remove foil and sprinkle with Parmesan cheese and bread crumbs. Increase oven heat to 425°F and bake 10-15 minutes or until top is golden brown. Remove from oven and let rest 5 minutes before serving.

Tuesday, September 26, 2017

Devon


We didn’t make it to the annual Devon meeting this year---the first time in a long time. But at the time of the meeting I got the fall ‘Devon USA’ magazine. One thing of interest was a reprint of a 1952 ‘Devon Cattle Quarterly.’ At this time we have the only Devon herd in Mississippi. I know of a couple in Louisiana and one in Alabama. But in 1950 there were Devon breeders prominently mentioned that lived in Wilkinson County as we do. Several more were mentioned in other towns in southern Mississippi and several in adjoining parishes in Louisiana. Maybe someone remembers Sam H. Williams of Monroeville, Alabama or CA and James J. Cravey of Florala. Devon almost disappeared in the United States as producers began more and more to ship to feed lots where Devon did not do well. I got in touch with Devon when searching endangered breeds.
Devon are a breed meant to be finished on grass. One article in the Devon magazine touted the health benefits of grass-fed dairy, especially milking Devon: lower amounts of the types of saturated fats that raise levels of LDL cholesterol, higher in omega-3 fatty acids, and lower in omega-6 fatty acids.
The grass-fed beef market is growing. Grass-fed beef has grown from a $5 million dollar a year industry ten years ago to a $75 million dollar industry today. I was in Baton Rouge at Whole Foods the other day and the butcher was recommending to a lady the grain finished beef as superior eating. He grudgingly admitted the health benefits of grass-finished but not the eating quality. Not all grass-fed is finished equally and quality can vary. It’s best if you know your producer and he finishes the beef properly. That is hard to do. In Britain, Devon have long been known as the butcher’s breed. One writer called Devon as a “just look at a cake and put on weight type of girl.” It is the fat in the finished product that is not only healthy but gives the finished beef superior flavor.
While I was at Whole Foods I bought a grass-fed brisket and I usually do not cook a brisket. I know it to be tough and that it has to be cooked long.  We know brisket is used for barbecue and there are so many recipes out there for barbecue. I just decided to do a simple beer brisket recipe and cook it slow. It was delicious and I can say I will cook brisket more often.
 This brisket turns out so tender and juicy---no knife required.
 

Beer Brisket
Serves 6
Ingredients:
1 (4 pound) beef brisket, trimmed of fat
Salt to taste
1 large onion, sliced
1 (12 fluid ounce) can beer
1 tablespoon brown sugar
1 cube beef bouillon
2 tablespoons coarsely ground black pepper
2 teaspoons minced garlic
1 bay leaf
¼ teaspoon dried thyme
2 tablespoons cornstarch
2 tablespoons water
Directions:
 Preheat the oven to 350 degrees F.
Season the beef brisket with salt, and place in a baking dish. Cove the entire roast with onion slices. In a  medium bowl, mix together the beer, brown sugar, beef bouillon, pepper, garlic, bay leaf, and thyme. Pour over the roast. Cover with aluminum foil.
Bake for 4 hours in the preheated oven. The brisket should be fork tender. Mix together the cornstarch and water; stir into the juices in the baking dish to thicken. Remove the bay leaf. Slice and serve the meat.

French Apple Cake


I have found a recipe that could be better than apple pie. A French apple cake. I have been reading Christopher Kimball’s ‘Milk Street Magazine’ for several months now, and he now has his own show on PBS, so I will be happy to be able to see it this Saturday on our PBS station. I love the way he describes the ups and downs of recipes and what does and does not work. Since he does it for you, the recipe you get is pretty much tested.

This French apple cake is a last-minute dessert that can be thrown together pretty much without a recipe but of course we have a recipe. The beauty is we don’t have to roll out a crust as for a pie and not cutting the butter into pea-sized pieces.

The secret of this tasty recipe is the browning of the butter and caramelized apples. The varieties of the apples here are a combination of tart and sweet. This cake is a cross between apple pie, tarte tatin and apple cake. It is delicious served plain but it would be great with crème fraiche or ice cream.

So treat your family this easy dessert!

French Apple Cake

Start to finish: 1 hour (25 active) plus cooling

Serves 8

8 tablespoons (1 stick) salted butter, plus more for pan

¼ teaspoon ground allspice

1 ½ pounds Granny Smith apples, peeled, cored, cut into ¼-inch slices

1 pound Braeburn or Golden Delicious apples, peeled, cored and cut into ¼-inch slices

12 tablespoons white sugar, divided

½ teaspoon kosher salt

2 tablespoons Brandy or Calvados

2/3 cups all-purpose flour, plus more for pan

1 teaspoon baking powder

2 large eggs

2 teaspoons vanilla extract

Heat the oven to 375°F with a rack in the middle position. Coat a 9-inch springform pan with butter, dust with flour, then tap out the excess.

In a 12-inch skillet over medium-high, melt the butter. Cook, swirling the pan frequently, until the milk solids are golden brown and the butter has a nutty aroma, 1 to 3 minutes. Pour into a small heatproof bowl; don’t scrape the skillet. Stir allspice into the butter. Set aside.

Add all the apples, 2 tablespoons of the sugar and the salt to the still hot skillet and set over medium-high. Cook, stirring occasionally, until all the moisture released by the apples has evaporated and the slices are beginning to brown, 12 to 15 minutes. Add the brandy and cook until evaporated, 30 to 60 seconds. Transfer to a large plate, spread in an even layer and refrigerate uncovered until cool to the touch, 15 to 20 minutes.

In a small bowl, whisk the flour and baking powder. In a large bowl, whisk the eggs, vanilla and 9 tablespoons of the sugar; gradually whisk in the butter. Add the flour mixture and stir until evenly coated. Transfer to the prepared pan, spread in an even layer and sprinkle with the remaining tablespoons of sugar.

Bake until deeply browned, 35 to 40 minutes. Let cool completely in the pan on a wire rack, about 2 hours. Run a knife around the inside of the pan and remove the sides before slicing.

Delicious!


have found a recipe that could be better than apple pie. A French apple cake. I have been reading Christopher Kimball’s ‘Milk Street Magazine’ for several months now, and he now has his own show on PBS, so I will be happy to be able to see it this Saturday on our PBS station. I love the way he describes the ups and downs of recipes and what does and does not work. Since he does it for you, the recipe you get is pretty much tested.

This French apple cake is a last-minute dessert that can be thrown together pretty much without a recipe but of course we have a recipe. The beauty is we don’t have to roll out a crust as for a pie and not cutting the butter into pea-sized pieces.

The secret of this tasty recipe is the browning of the butter and caramelized apples. The varieties of the apples here are a combination of tart and sweet. This cake is a cross between apple pie, tarte tatin and apple cake. It is delicious served plain but it would be great with crème fraiche or ice cream.

So treat your family this easy dessert!

French Apple Cake

Start to finish: 1 hour (25 active) plus cooling

Serves 8

8 tablespoons (1 stick) salted butter, plus more for pan

¼ teaspoon ground allspice

1 ½ pounds Granny Smith apples, peeled, cored, cut into ¼-inch slices

1 pound Braeburn or Golden Delicious apples, peeled, cored and cut into ¼-inch slices

12 tablespoons white sugar, divided

½ teaspoon kosher salt

2 tablespoons Brandy or Calvados

2/3 cups all-purpose flour, plus more for pan

1 teaspoon baking powder

2 large eggs

2 teaspoons vanilla extract

Heat the oven to 375°F with a rack in the middle position. Coat a 9-inch springform pan with butter, dust with flour, then tap out the excess.

In a 12-inch skillet over medium-high, melt the butter. Cook, swirling the pan frequently, until the milk solids are golden brown and the butter has a nutty aroma, 1 to 3 minutes. Pour into a small heatproof bowl; don’t scrape the skillet. Stir allspice into the butter. Set aside.

Add all the apples, 2 tablespoons of the sugar and the salt to the still hot skillet and set over medium-high. Cook, stirring occasionally, until all the moisture released by the apples has evaporated and the slices are beginning to brown, 12 to 15 minutes. Add the brandy and cook until evaporated, 30 to 60 seconds. Transfer to a large plate, spread in an even layer and refrigerate uncovered until cool to the touch, 15 to 20 minutes.

In a small bowl, whisk the flour and baking powder. In a large bowl, whisk the eggs, vanilla and 9 tablespoons of the sugar; gradually whisk in the butter. Add the flour mixture and stir until evenly coated. Transfer to the prepared pan, spread in an even layer and sprinkle with the remaining tablespoons of sugar.

Bake until deeply browned, 35 to 40 minutes. Let cool completely in the pan on a wire rack, about 2 hours. Run a knife around the inside of the pan and remove the sides before slicing.

Delicious!


Yucatan, Recipes from a Culinary Expedition


I looked all over Mérida for an English cook book on the Yucatan but it was not to be had. Upon returning home my husband found one to order that turned out to be a James Beard Award winning book. It is a fabulous book and the author David Sterling spent 10 years of his life researching and writing the book. It would have been too heavy to bring home even if for sale in Mérida.

The Yucatan peninsula is home to one of the world’s greatest regional cuisines. With a foundation of native Maya dishes made from fresh local ingredients, it shares much with the same pantry of ingredients, and many culinary practices with the rest of Mexico. Yet, due to its isolated peninsular location, it was also in a unique position to absorb the foods and flavors of such far flung regions as Spain and Portugal, France, Holland, Lebanon and the Levant, Cuba and the Caribbean, and Africa.

In recent years, gourmet magazines and celebrity chefs have popularized certain Yucatecan dishes and ingredients, such as Sopa de lima (which I did this weekend and the recipe is below.) David Sterling takes you on a gastronomic tour of the peninsula in this cookbook and presents the food in the places where it’s savored. Sterling begins in jungle towns where Mayas concoct age old recipes with a few simple ingredients they grow themselves. He travels over a thousand miles along the broad Yucatan coast to sample a bounty of seafood; shares “the people’s food” at bakeries, street vendors, home restaurants, and cantinas.

This journey of Sterling serves up over 275 authentic, thoroughly tested recipes that will appeal to both novice and professional cooks. The book discusses pantry staples and basic cooking techniques and offers substitutions for local ingredients that may be hard to find elsewhere.

The book took me all weekend just to glance though since it is almost 600 pages. But the book is beautifully done and probably the most definitive work on this distinctive cuisine.

Sopa de lima is the classic soup of the Yucatan. The lima (Citrus limetta) also known as limmeta or sweet lime is more aromatic and less acidic that the Persian or Mexican lime and gives this soup its characteristic taste. But since we cannot get this lime you have to use the Persian or Mexican lime. This soup is very tasty and can be prepared in advance, refrigerated, and reheated just before serving. It can also be served chilled.  We had this soup at a restaurant and I didn’t think it was so great, but doing it at home I felt it was a better soup and worth the effort of creating.

Sopa de Lima

Chicken soup with sweet lime essence

10 servings

For the soup base:

10 cups chicken stock

½ medium chicken (1 ½ lbs.)

1 sprig fresh thyme (1/4 tsp. dried)

Prepare Soup Base:

Place the stock, chicken, and thyme in a stockpot and bring to a simmer, skimming frequently. Continue to cook gently until the chicken is cooked through, 25-30 minutes.

Remove the chicken and set aside to cool. Pull the meat from the bones into large pieces or slice into julienne strips; set aside.

Strain the stock through a fine sieve into another pot. If time allows, refrigerate the stock several hours or overnight and skim off any fat before finishing.

For the sofrito and finishing:

Zest of one lime, finely grated

2 Tbs. olive oil

4 cloves garlic. Finely chopped

1 medium white onion, finely chopped

1 cup green bell pepper, finely diced

3 medium Roma tomatoes, seeded and finely chopped

1/3 cup fresh lime juice (Mexican or Persian lime juice)

Place the stock in a stockpot and return to the simmer. Add the citrus zest, cover the pot, and remove it from the heat to allow the stock to steep as you continue.

While the stock is steeping, heat the oil in a large skillet until shimmering. Add the next three ingredients and cook, stirring frequently, until the onions are translucent, 2-3 minutes. Add the tomatoes and continue to cook until the tomatoes are softened, about 3 minutes. Add the sofrita (the garlic, onions and green pepper) to the stock. Stir in the chicken and simmer 2-3 minutes to heat through. Add the citrus juice and serve immediately.

For Serving:

Chopped cilantro

Fried soft taco shells cut into strips and fried in olive oil (I thought these were great and a nice snack even without the soup.)

Slices of lime

To Serve:

Ladle the soup into individual bowls, distributing the chicken evenly. Sprinkle on some of the cilantro and top with the strips of fried soft taco shells, and slices of lime. You can place extra cilantro and taco strips which some chili sauce on the table so diners can adjust their soup to taste.